Emerald AI Wiki
  • Home
  • Getting Started
    • Included Demo Scenes
      • Shooter AI Demo
      • Melee Combat Demo
      • Ranged Combat Demo
      • Summoning AI Demo
      • Healing Demo
      • Patrolling Demo
      • Inverse Kinematics Demo
      • Ragdoll Demo
      • Grenade Demo
      • Footsteps Demo
      • Random Waypoints Demo
      • Dynamic Wandering Demo
      • Health Bar Demo
      • Alignment Demo
      • Explosion Damage Demo
      • Sound Detection Demo
      • Fleeing Demo
      • Mouse Movement Demo
      • Companion Demo
      • Equippable Weapon Demo
      • Optimization Demo
      • Working Villager Demo
      • Debugging Demo Scene
    • Getting Started
    • Baking NavMesh
    • Setting up a Player with Emerald AI
    • Upgrading to URP and HDRP
    • Difference Between Emerald AI 3.0 and Emerald AI 2025
  • Help
    • Solutions to Possible Issues
    • Using the Wiki Search Tool
    • Release Notes
    • Support
  • Emerald Components (Required)
    • Animation Component
      • Creating an Animation Profile
      • Opening the Animation Viewer
    • Behaviors Component
      • Creating an Aggressive AI
      • Creating a Companion AI
      • Creating a Cautious AI
      • Creating a Coward AI
      • Creating a Passive AI
      • Creating a Pet AI
      • Creating Custom AI Behaviors
    • Combat Component
      • Assigning Combat Actions
      • Assigning Attack Transforms
      • Assigning Ability Objects
      • Weapon Type Amounts
    • Detection Component
      • Applying a Head Transform
      • Setting up the Detection Layers and Player Tag
      • Faction Relations
    • Movement Component
      • Using the Align AI Settings
      • Using the Dynamic Wander Type
      • Using the Waypoints Wander Type
      • Using the Stationary Wander Type
      • Using the Destination Wander Type
    • Health Component
      • Setting up an AI's Health
      • Setting up an AI's Hit Effects
    • Sounds Component
      • Creating an AI's Sound Profile
  • Emerald Components (Optional)
    • Adding and Removing Optional Components
    • Cover Component
      • Applying the Cover Component
      • Setting up the Cover Component
      • Setting up Cover Nodes
    • Debugger Component
      • Applying the Debugger Component
      • Drawing an AI's Path
      • Drawing an AI's Destination
      • Drawing an AI's Line of Sight
      • Drawing an AI's Undetected Targets Line
      • Debug Log Targets
      • Debug Log Current Obstruction
    • Decal Component
      • Applying the Decals Component
      • Setting up the Decals Component
    • Events Component
      • Applying the Events Component
      • Creating an Event Through the Editor
      • Creating an Event Through Code
    • Footsteps Component
      • Applying the Footsteps Component
      • Setting up the Footsteps Component
    • Inverse Kinematics Component
      • Applying the IK Component
      • Creating an Animation Rig and Multi-Aim Constraint
      • More Info on the Animation Rigging Package
    • Items Component
      • Applying the Items Component
      • Creating Equippable Weapons
    • Location Based Damage Component
      • Applying the LBD Component
      • Assigning Colliders to the LBD Component
      • Damaging the LBD Component
    • Optimization Component
      • Applying the Optimization Component
      • Setting up the Optimization Component
    • Sound Detector Component
      • Applying the Sound Detector Component
      • Understanding the Sound Detector Settings
      • Using an Attract Modifier
    • Target Position Modifier Component
      • Setting up the TPM Component on an AI
      • Setting up the TPM Component on a Player
    • UI Component
      • Applying the UI Component
      • Setting up the UI Component
    • Weapon Collision Component
      • Applying the Weapon Collision Component
      • Setting up the Weapon Collision Component
  • API
    • Accessing the EmeraldAPI Script
    • Available API
      • Movement API
      • Combat API
      • Faction API
      • Sound API
      • Animation API
      • UI API
      • Detection API
      • Behaviors API
      • Health API
      • Items API
    • Damaging an AI
    • Damaging a Custom Character Controller
    • Using the Built-in Object Pooling
  • Emerald Profiles & Objects
    • Ability Object
      • Bullet Projectile Ability
      • Grenade Ability
      • General Projectile Ability
      • Ground Projectile Ability
      • Aerial Projectile Ability
      • Arrow Projectile Ability
      • Melee Ability
      • Teleport Ability
      • Summon Ability
      • Healing Ability
      • Area of Effect Ability
      • The Collider Module
      • The Damage Module
    • Combat Action Object
      • Blocking Combat Action
      • Dodge Combat Action
      • Strafe Combat Action
      • Random Movement Combat Action
      • Switch Target Combat Action
      • Creating Custom Combat Actions Through Code
    • Reaction Object
      • Creating a Reaction Object
      • Included Reaction Objects
    • Animation Profile
      • Creating an Animator Controller
      • Applying Animations
      • Regenerate Animator Controllers
      • Copying Animation Profiles
    • Sound Profile
      • Creating an AI's Sound Profile
      • Setting up Footstep Sounds
      • Setting up Attack Sounds
      • Setting up Warning Sounds
      • Setting up Death Sounds
    • Waypoint Profile
    • Footstep Surface Object
      • Creating a new Footstep Surface Object
      • Setting up a Footstep Surface Object
  • Emerald Managers
    • Setup Manager
      • Setting up an AI with the Setup Manager
    • AI Duplicator Manager
      • Duplicating an AI
    • Animation Viewer Manager
      • Opening the Animation Viewer
      • Previewing Animations
      • Creating and Applying Animation Events
      • Creating Attack Animation Events
    • Faction Manager
      • Modifying Factions Through the Faction Manager
    • Combat Text Manager
      • Adjusting the Combat Text Settings
      • Accessing the Combat Text System Through Code
  • Integrations
    • Integrations
      • Final IK
      • Invector
      • FPS Engine
      • Dialogue System
      • Quest Machine
      • Love/Hate
Powered by GitBook
On this page
  • Setting up an AI with the Setup Manager
  • Step 1
  • Step 2
  • Step 3
  • Step 4
  • Step 5
  • Step 6

Was this helpful?

  1. Emerald Managers
  2. Setup Manager

Setting up an AI with the Setup Manager

Last updated 1 year ago

Was this helpful?

Important: The GameObject you are creating an AI with should have an with an Avatar assigned. An Animator Controller will be created in a further step.

Note: It is recommended that no other Unity Components, other than the Animator Component, are attached to the GameObject you are creating an AI with.

Setting up an AI with the Setup Manager

The Setup Manager allows users to easily set up an AI on the desired GameObject by automatically applying all required components. There's also a list of optional components that can be selected that will add additional features and mechanics. The set up process will be finalized after the user has pressed the Setup AI button.

Step 1

You can open the Setup Manager by going to Window>Emerald AI>Setup Manager or by pressing ctrl+shift+e within Unity.

Step 2

You should now be able to see the Setup Manager. Look for the AI Object slot and assign the object you would like to be an AI. This object should have an Animator on it. There are text boxes that explain what every setting does and is used for.
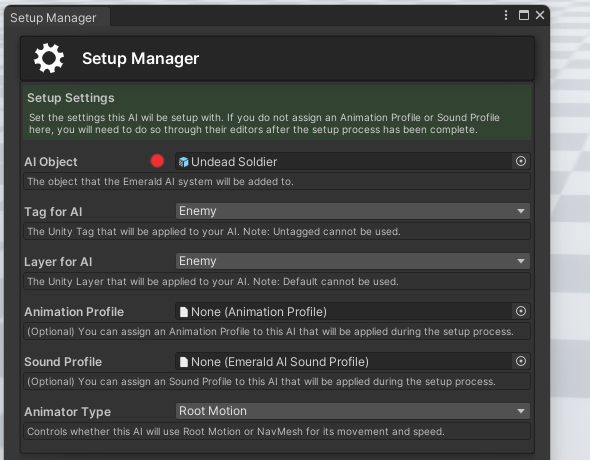
Step 3

Choose a Tag and Layer for your AI. This is dependent on your project and should be kept the same for all AI objects. In this example, we will be using the Enemy layer and tag.

Important: Ensure your tags and layers are correct. Having incorrect tags and layers can result in AI not being able to properly detect targets. These Tags and Layers will be used in another step.

Step 4

Next, choose whether your AI will use Root Motion or Nav Mesh Movement. Root Motion AI will be driven by their animation's movement. Animations that use In-Place animations should use Nav Mesh Movement.

Important: Selecting the wrong option can cause AI to move incorrectly. If you are unsure what animations your AI is using, you can refer to the Animation Pack's information as it typically tells you.

Note: You can optionally assign an Animation Profile and/or a Sound Profile if you have already set them up with other AI. These will be automatically assigned during the setup process.

Step 5

By default, all Required Components will be added to the AI Object. Users can choose additional components to add from the Optional Components list by checking any of the checkboxes. You can see detailed information via a tooltip for each component by putting the mouse over the ?.

Note: The Target Position Modifier component is recommended to improve targeting accuracy, however, this requires an additional step for setting up.

Note: Some Optional components require additional steps for setting up. If you are just starting out, it is recommended that you stick with the Required Components and optional Target Position Modifier.

Step 6

Once you have finished doing all the above, you can press the Setup AI button at the bottom of the Setup Manager. You must have an object assigned to the AI Object slot for this button to become interactable.

Note: Making a GameObject an AI requires the AI Object to be , given that it is a . However, this object can then be made into a new prefab after the set up process has finished.

Unpacked
Prefab
Animator Component