Emerald AI Wiki
  • Home
  • Getting Started
    • Included Demo Scenes
      • Shooter AI Demo
      • Melee Combat Demo
      • Ranged Combat Demo
      • Summoning AI Demo
      • Healing Demo
      • Patrolling Demo
      • Inverse Kinematics Demo
      • Ragdoll Demo
      • Grenade Demo
      • Footsteps Demo
      • Random Waypoints Demo
      • Dynamic Wandering Demo
      • Health Bar Demo
      • Alignment Demo
      • Explosion Damage Demo
      • Sound Detection Demo
      • Fleeing Demo
      • Mouse Movement Demo
      • Companion Demo
      • Equippable Weapon Demo
      • Optimization Demo
      • Working Villager Demo
      • Debugging Demo Scene
    • Getting Started
    • Baking NavMesh
    • Setting up a Player with Emerald AI
    • Upgrading to URP and HDRP
    • Difference Between Emerald AI 3.0 and Emerald AI 2025
  • Help
    • Solutions to Possible Issues
    • Using the Wiki Search Tool
    • Release Notes
    • Support
  • Emerald Components (Required)
    • Animation Component
      • Creating an Animation Profile
      • Opening the Animation Viewer
    • Behaviors Component
      • Creating an Aggressive AI
      • Creating a Companion AI
      • Creating a Cautious AI
      • Creating a Coward AI
      • Creating a Passive AI
      • Creating a Pet AI
      • Creating Custom AI Behaviors
    • Combat Component
      • Assigning Combat Actions
      • Assigning Attack Transforms
      • Assigning Ability Objects
      • Weapon Type Amounts
    • Detection Component
      • Applying a Head Transform
      • Setting up the Detection Layers and Player Tag
      • Faction Relations
    • Movement Component
      • Using the Align AI Settings
      • Using the Dynamic Wander Type
      • Using the Waypoints Wander Type
      • Using the Stationary Wander Type
      • Using the Destination Wander Type
    • Health Component
      • Setting up an AI's Health
      • Setting up an AI's Hit Effects
    • Sounds Component
      • Creating an AI's Sound Profile
  • Emerald Components (Optional)
    • Adding and Removing Optional Components
    • Cover Component
      • Applying the Cover Component
      • Setting up the Cover Component
      • Setting up Cover Nodes
    • Debugger Component
      • Applying the Debugger Component
      • Drawing an AI's Path
      • Drawing an AI's Destination
      • Drawing an AI's Line of Sight
      • Drawing an AI's Undetected Targets Line
      • Debug Log Targets
      • Debug Log Current Obstruction
    • Decal Component
      • Applying the Decals Component
      • Setting up the Decals Component
    • Events Component
      • Applying the Events Component
      • Creating an Event Through the Editor
      • Creating an Event Through Code
    • Footsteps Component
      • Applying the Footsteps Component
      • Setting up the Footsteps Component
    • Inverse Kinematics Component
      • Applying the IK Component
      • Creating an Animation Rig and Multi-Aim Constraint
      • More Info on the Animation Rigging Package
    • Items Component
      • Applying the Items Component
      • Creating Equippable Weapons
    • Location Based Damage Component
      • Applying the LBD Component
      • Assigning Colliders to the LBD Component
      • Damaging the LBD Component
    • Optimization Component
      • Applying the Optimization Component
      • Setting up the Optimization Component
    • Sound Detector Component
      • Applying the Sound Detector Component
      • Understanding the Sound Detector Settings
      • Using an Attract Modifier
    • Target Position Modifier Component
      • Setting up the TPM Component on an AI
      • Setting up the TPM Component on a Player
    • UI Component
      • Applying the UI Component
      • Setting up the UI Component
    • Weapon Collision Component
      • Applying the Weapon Collision Component
      • Setting up the Weapon Collision Component
  • API
    • Accessing the EmeraldAPI Script
    • Available API
      • Movement API
      • Combat API
      • Faction API
      • Sound API
      • Animation API
      • UI API
      • Detection API
      • Behaviors API
      • Health API
      • Items API
    • Damaging an AI
    • Damaging a Custom Character Controller
    • Using the Built-in Object Pooling
  • Emerald Profiles & Objects
    • Ability Object
      • Bullet Projectile Ability
      • Grenade Ability
      • General Projectile Ability
      • Ground Projectile Ability
      • Aerial Projectile Ability
      • Arrow Projectile Ability
      • Melee Ability
      • Teleport Ability
      • Summon Ability
      • Healing Ability
      • Area of Effect Ability
      • The Collider Module
      • The Damage Module
    • Combat Action Object
      • Blocking Combat Action
      • Dodge Combat Action
      • Strafe Combat Action
      • Random Movement Combat Action
      • Switch Target Combat Action
      • Creating Custom Combat Actions Through Code
    • Reaction Object
      • Creating a Reaction Object
      • Included Reaction Objects
    • Animation Profile
      • Creating an Animator Controller
      • Applying Animations
      • Regenerate Animator Controllers
      • Copying Animation Profiles
    • Sound Profile
      • Creating an AI's Sound Profile
      • Setting up Footstep Sounds
      • Setting up Attack Sounds
      • Setting up Warning Sounds
      • Setting up Death Sounds
    • Waypoint Profile
    • Footstep Surface Object
      • Creating a new Footstep Surface Object
      • Setting up a Footstep Surface Object
  • Emerald Managers
    • Setup Manager
      • Setting up an AI with the Setup Manager
    • AI Duplicator Manager
      • Duplicating an AI
    • Animation Viewer Manager
      • Opening the Animation Viewer
      • Previewing Animations
      • Creating and Applying Animation Events
      • Creating Attack Animation Events
    • Faction Manager
      • Modifying Factions Through the Faction Manager
    • Combat Text Manager
      • Adjusting the Combat Text Settings
      • Accessing the Combat Text System Through Code
  • Integrations
    • Integrations
      • Final IK
      • Invector
      • FPS Engine
      • Dialogue System
      • Quest Machine
      • Love/Hate
Powered by GitBook
On this page
  • Creating Equippable Weapons
  • Applying Equipping Animations
  • Creating Equipping Animation Events
  • Setting up a Weapon with the Items Component

Was this helpful?

  1. Emerald Components (Optional)
  2. Items Component

Creating Equippable Weapons

Last updated 4 months ago

Was this helpful?

Creating Equippable Weapons

Note: It is recommended you have your AI fully set up before proceeding. If you haven't yet done this, you can see the Getting Started section for a detailed tutorial on creating an AI.

Emerald AI features a built-in system that allows an AI to equip and unequip weapons through Animation Events and the game objects attached to their bones. This makes it possible for an AI to have more believable non-combat animation and to show an AI pulling out and putting away their weapons.

Applying Equipping Animations

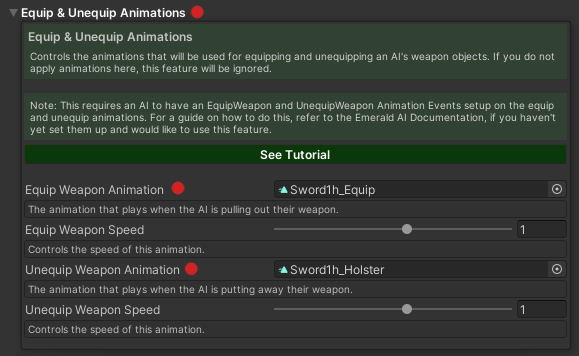
First, you will need to go to go to your AI's Animation Profile and assign an Equip and Unequip Animation.

The Equip and Unequip Animations can be found under the Equip & Unequip Animations foldout of your AI's Animation Profile.

Creating Equipping Animation Events

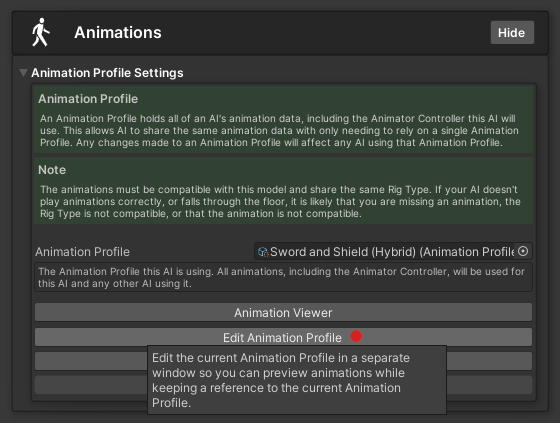
Next, you need to Open the Animation Viewer. This can be found within your AI's Animation Component right above the Edit Animation Profile button that was just pressed. The Animation Viewer allows you to view animations right within your scene and allows you to create Animation Events from a list of presets.

Once you you do this, you should see your AI previewing its animations.

Find your AI's Equip animation using the Current Animation pulldown then set the Event Type to Equip Weapon. Using the timeline area, find the frame you would like the weapon equipped and then press the Add Event button with the + icon. This will automatically add the Animation Event, along with all needed parameters.

Important: Choose the Equip Weapon event for the weapon type your AI is using. If your AI is using both weapon types, you will need to do this for both the Weapon Type 1 and Weapon Type 2 equip animations.

When you are done, press the Apply Changes at the bottom of the Animation Viewer to save your changes.

Important: You now need to do the same process, but for the AI's Unequip animation.

Find your AI's Unequip animation using the Current Animation pulldown then set the Event Type to Unequip Weapon. Using the timeline area, find the frame you would like the weapon unequipped and then press the Add Event button with the + icon. This will automatically add the Animation Event, along with all needed parameters.

Important: Choose the Equip Weapon event for the weapon type your AI is using. If your AI is using both weapon types, you will need to do this for both the Weapon Type 1 and Weapon Type 2 equip animations.

When you are done, press the Apply Changes at the bottom of the Animation Viewer to save your changes.

Setting up a Weapon with the Items Component

The last step is setting up the Items Component with your AI. If you have not already added an Items Component to your AI, please see the Applying the Items Component section.

With your AI selected, open the Weapon Settings foldout and create a new element by pressing the + button. Your AI needs to have two weapon objects; a holstered weapon (typically attached to the back or hip) and a held weapon (typically attached to the hand). The Holstered weapon will be the visible weapon when the weapon is not equipped and the Held weapon will be the visible weapon when the weapon is equipped.

You then add these weapon objects to the AI's Items Component. The Held object goes in the Held slot and the Holstered object goes in the Holstered slot.

Important: You will want to disable your held object so it is not visible. This will be enabled through the event we created when the AI is equipping their weapon.

When you are done, test out your AI to ensure everything works correctly. The AI should take equip their weapon when entering combat and put it away when they exit it. You can see the included Equippable Weapon Demo for a working example, if needed.

You can press the Edit Animation Profile button to open the profile in a separate window.